Sitecore to Sanity Migration Guide for Enterprises
Step-by-step technical roadmap covering strategy, execution, and team enablement
Here's what you'll learn from this blog:
- What are the benefits of migrating from Sitecore to Sanity for different teams within an organization?
- How does the cost of using Sanity compare to Sitecore?
- What are common objections to migrating from Sitecore to Sanity, and how can they be addressed?
- What are the steps involved in migrating from Sitecore to Sanity?
- How can a team prepare and train for the transition from Sitecore to Sanity?
Alright, so you're exploring a migration from Sitecore to Sanity.
Great move! You're probably here because Sitecore's licensing fees are getting harder to justify, or maybe your developers are tired of the complex .NET architecture. Whatever brought you here, you're in the right place.
Now, we know what you're thinking. This looks like a really comprehensive guide (and yes, it is—we covered everything).
But here's the thing. Your time is precious, and we're not going to make you read 10,000 words just to find the answer to one question.
So, we've made it easy for you.
Here's a quick roadmap to help you navigate this guide and get straight to the answers you're looking for:
- Start here if you want to discover the benefits of migrating to Sanity for your technical, editorial, and marketing teams.
- Start here for a deep dive into the ROI and cost comparison between Sanity and Sitecore.
- Start here if you want to address common objections people often have about Sitecore to Sanity migration.
- Start here for a DIY step-by-step guide on how to handle the migration yourself.
- Start here if you have specific questions about your unique migration needs.
Or skip all of that and book a free 30-minute call with us. Let's cut to the chase and tackle your questions head-on.
So, what are you waiting for?
Let's get into it and figure out how to get you from Sitecore to Sanity without the headaches!
WHY YOU SHOULD MIGRATE FROM SITECORE TO SANITY?
If you are already convinced to migrate from Sitecore to Sanity, then skip ahead to the section — How to migrate.
However, if you want to explore a few reasons and benefits for migrating to Sanity from Sitecore, read on.
The Benefits of Migrating from Sitecore to Sanity
Migrating from Sitecore to Sanity can offer significant advantages for various teams in your organization. Here's a closer look:
Benefits | Technical Teams | Editorial Teams | Marketing Teams |
|---|---|---|---|
Productivity | Modern API-first architecture with extensive developer tools | Real-time collaboration with intuitive Studio interface | Faster publishing workflows with structured content |
Customization | Schema-driven with complete extensibility via JavaScript | Flexible content modeling with custom input components | Personalization via frontend logic or third-party tools |
Cost-Effectiveness | No licensing fees, usage-based pricing, lower infrastructure costs | Minimal training required with user-friendly interface | Lower total cost of ownership with predictable pricing |
Flexibility | Framework-agnostic, works with Next.js, Remix, Astro, etc. | Portable Text for rich content across all channels | Omnichannel content delivery via powerful APIs |
Security | Built-in security with SOC 2 Type II compliance | Role-based access control and audit logs | Data protection compliance and secure asset delivery |
Cost Comparison: Sitecore vs Sanity
One of the most compelling reasons enterprises migrate from Sitecore to Sanity is the dramatic difference in total cost of ownership.
Sitecore typically costs:
- License fees: $80,000–$150,000+ annually for XM (On-Premise), or $100,000–$200,000+ for XM Cloud
- Infrastructure and hosting: $100,000+ annually for on-premise deployments
- Design and build: $100,000–$300,000+ one-time cost
- Specialized developers: $200/hour for .NET/C# specialists
- Support and maintenance: $25,000–$75,000 annually (on-premise) or $30,000–$100,000 (cloud)
- Premium add-ons: $100,000+ annually for marketing automation, personalization, and other modules
- Non-production environments: $20,000–$50,000 annually
- Total 3-year cost: $1M–$2M (on-premise) or $700K–$1.5M (cloud)
Sanity's transparent, usage-based pricing:
Plan | Free | Growth |
|---|---|---|
Monthly Cost | $0 forever | $15/seat/month |
User Seats | Up to 20 | Up to 50 |
Datasets | 2 (public only) | 2 (private or public) |
Documents | 10,000 | 25,000 |
API CDN Requests | 1M/month | 1M/month |
Bandwidth | 100GB/month | 100GB/month |
Assets Storage | 100GB | 100GB |
Best For | Individuals & small projects | Growing teams (recommended) |
Estimated Sanity costs for enterprise:
- Growth plan for 30 users: $450/month ($5,400/year)
- Enterprise plan (typical): $80,000–$128,000/year (includes custom usage, premium support, SSO)
- Infrastructure: $0 (fully managed by Sanity with global CDN included)
- Developer costs: 50–70% lower (JavaScript/TypeScript vs. specialized .NET)
- Add-ons: Optional (SSO: $1,399/month, Dedicated Support: $799/month, Extra datasets: $999/month each)
- Total 3-year cost: $200,000–$400,000
Cost savings comparison:
Item | Sitecore (3 years) | Sanity (3 years) | Savings |
|---|---|---|---|
Licensing | $240K–$600K | $0–$384K | Up to $216K |
Infrastructure | $300K+ | $0 (included) | $300K+ |
Developers | Higher (.NET specialists) | Lower (JavaScript) | 50–70% |
Maintenance | $75K–$300K | Included in plan | $75K–$300K |
Total | $1M–$2M | $200K–$400K | $600K–$1.6M |
Most enterprises save 60–80% on total CMS costs within the first year of migrating from Sitecore to Sanity, with even greater savings compounding over time.
Note: Costs based on an enterprise with ~30 content editors, approximately 1 million monthly visitors, and moderate usage. Actual costs may vary based on specific requirements and usage patterns.
High-Level Comparison: Sitecore vs Sanity
Feature | Sitecore | Sanity |
|---|---|---|
Platform Type | Monolithic, all-in-one CMS | Headless, composable CMS |
Licensing | Enterprise license ($50K–$150K+/year) | Pay-as-you-go, usage-based pricing |
Content Delivery | Page-based rendering | Structured content via API |
Customization | Complex, requires .NET expertise | Schema-driven, JavaScript-based |
Editor Experience | Traditional form-based interface | Real-time collaborative Studio |
Integrations | Proprietary ecosystem | Open API + plugin marketplace |
Scalability | Requires infrastructure planning | Global CDN-backed Content Lake |
Time to Market | Months for changes | Hours to days for changes |
Developer Experience | .NET/C# specialists required | JavaScript/TypeScript developers |
Sanity's modern architecture aligns perfectly with enterprises seeking content agility, lower total cost of ownership, and long-term maintainability.
COMMON OBJECTIONS ABOUT SITECORE TO SANITY MIGRATION
We understand that migrating from an established CMS like Sitecore to a headless platform like Sanity raises questions. Let's address the most common concerns we hear from enterprises considering this migration:
1. Sitecore offers robust personalization features. Can Sanity match that?
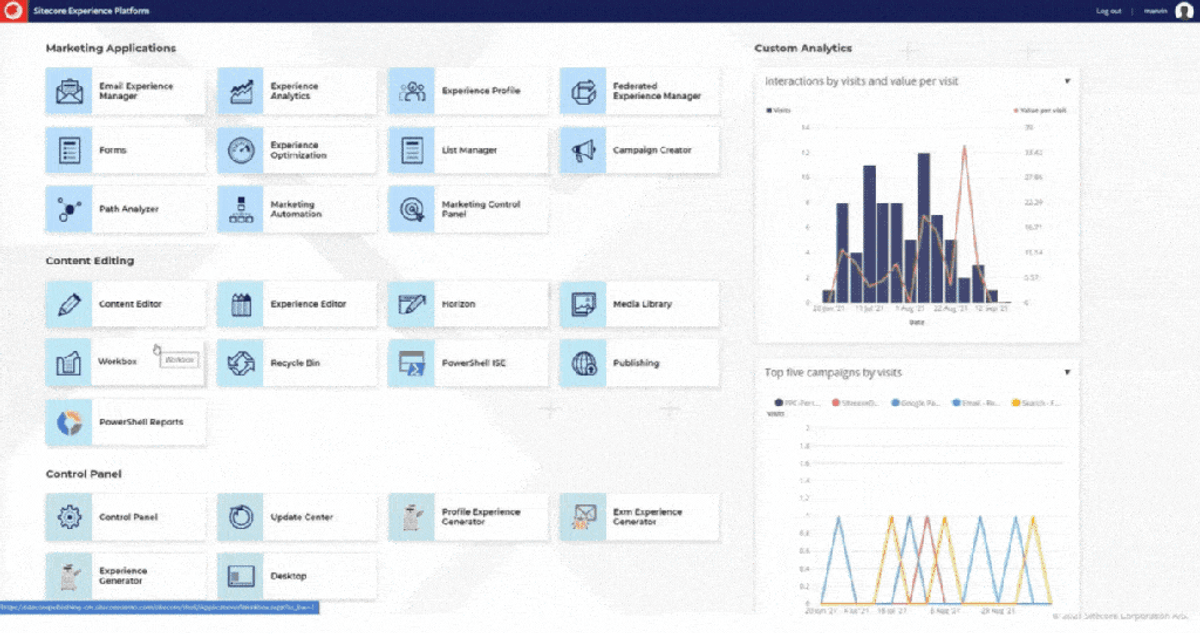
Sitecore's Experience Platform provides built-in personalization, but it comes with significant complexity and cost. With Sanity, you have the flexibility to implement personalization at the frontend layer using best-of-breed tools.
This approach gives you more control, better performance, and the ability to switch personalization providers without CMS lock-in.
2. Our team is trained on Sitecore. How difficult is the transition?
Sanity Studio is intentionally designed to be intuitive. Most content editors become productive within hours, not weeks.
For developers, if your team knows JavaScript, they're already equipped to work with Sanity. The schema-driven approach is more familiar to modern developers than Sitecore's .NET architecture.
Plus, we provide comprehensive training programs tailored to your team's roles—ensuring a smooth transition for everyone from editors to administrators.
3. Will we lose our existing content and SEO rankings?
Absolutely not. A properly executed migration includes:
- Content mapping and transformation to preserve all your valuable content
- Comprehensive URL mapping and 301 redirects to maintain SEO equity
- Metadata migration including titles, descriptions, and structured data
- Pre-launch SEO audits to ensure nothing is missed
Most of our clients see maintained or improved search rankings post-migration due to Sanity's superior performance and clean URL structures.
4. How long does a Sitecore to Sanity migration take?
Migration timelines vary based on:
- Content volume and complexity
- Custom functionality requirements
- Frontend architecture (new vs. existing)
- Team availability and resources
Typical enterprise migrations take 12–20 weeks, broken down as:
- Strategy and planning: 2–3 weeks
- Content modeling and schema design: 2–3 weeks
- Frontend development: 4–8 weeks
- Content migration and testing: 2–4 weeks
- Training and launch: 1–2 weeks
Starting with a phased approach can reduce initial timeline and risk.
5. What about multisite and multilingual capabilities?
Sanity excels at both:
Multisite management: Sanity's flexible schema lets you manage multiple sites from one Studio with shared or site-specific content. You can structure datasets to isolate content or share it across properties.
Multilingual support: Use Sanity's official internationalization plugin or structure language variants in your schema. Unlike Sitecore's rigid language management, Sanity gives you complete control over translation workflows.
Many clients find Sanity's approach more flexible and easier to manage than Sitecore's multisite architecture.
6. Sitecore integrates with our existing MarTech stack. Will Sanity?
One of Sanity's greatest strengths is its open, API-first architecture. It integrates seamlessly with:
- Marketing automation: HubSpot, Marketo, Eloqua
- Analytics: Google Analytics, Segment, Amplitude
- E-commerce: Shopify, BigCommerce, commercetools
- Search: Algolia, Elastic, Coveo
- DAM systems: Cloudinary, Bynder, Widen
Because Sanity doesn't try to be an all-in-one solution, you can choose best-of-breed tools for each function and integrate them exactly how you need.
7. What if we need custom functionality?
Sanity is highly extensible through:
- Custom input components for tailored editing experiences
- Document actions and badges for workflow automation
- Webhooks for external integrations
- Custom APIs via serverless functions
- Plugins from the community marketplace
Unlike Sitecore's rigid architecture, Sanity's JavaScript-based extensibility means your developers can build exactly what you need without fighting the framework.
8. How do we handle workflows and approvals?
Sanity provides flexible workflow capabilities through:
- Built-in draft/publish states
- Scheduled publishing for time-based releases
- Custom document actions for approval processes
- Integration with tools like Slack for notifications
- Audit logs tracking all changes and who made them
Many clients build sophisticated approval workflows using Sanity's extensibility—often simpler and more tailored than Sitecore's workflow engine.
9. Who should handle our migration—internal team or experts?
The answer depends on:
- Your team's expertise with headless CMS and modern JavaScript frameworks
- Available resources and timeline constraints
- Complexity of your Sitecore implementation
- Risk tolerance for potential issues
Benefits of working with migration experts:
- Faster time to market with proven methodologies
- Risk mitigation through experience with common pitfalls
- Knowledge transfer that empowers your team long-term
- Post-launch support during the critical early days
At Multidots, we've successfully migrated dozens of enterprise sites from traditional CMS platforms to modern headless architectures, including Sanity. Our team brings expertise in both Sitecore and Sanity, ensuring nothing is lost in translation.
10. What's the ROI of moving to Sanity?
According to a recent Forrester Total Economic Impact™ study, enterprises migrating to Sanity see an ROI of 272% with a payback period of less than 6 months.
Immediate cost savings:
- Elimination of legacy CMS licensing fees (Sitecore typically costs $50K–$150K+ annually)
- Reduced infrastructure and hosting costs
- Lower developer costs (JavaScript developers vs. specialized .NET expertise)
- Average savings of $239,000 over three years from replacing two legacy tools
Productivity gains:
- 50% improvement in content team productivity through streamlined workflows and real-time collaboration
- Content teams can now manage 4x more content with the same team size
- Reduced time-to-market: Projects that previously took a quarter now launch in days
- $793,000 in productivity savings over three years
Performance and reliability improvements:
- 75% reduction in downtime through Sanity's robust infrastructure and real-time content delivery
- Elimination of cache-related issues and content hosting struggles
- $716,000 in savings from reduced downtime over three years
- Improved system stability during high-traffic periods
Long-term benefits:
- Future-proof architecture that adapts to new channels (mobile, IoT, voice assistants)
- Reduced technical debt with clean, modern codebase
- Scalable content operations without compromising quality
- Easier hiring with popular JavaScript/TypeScript technologies
Real-world results:
Organizations in the Forrester study reported being able to make 18,000 content changes annually that previously required developers, while commercial teams now make 25,000 changes themselves. One company scaled from managing 2,000 hotels once a year to managing 40,000 hotels multiple times per year with the same team size.
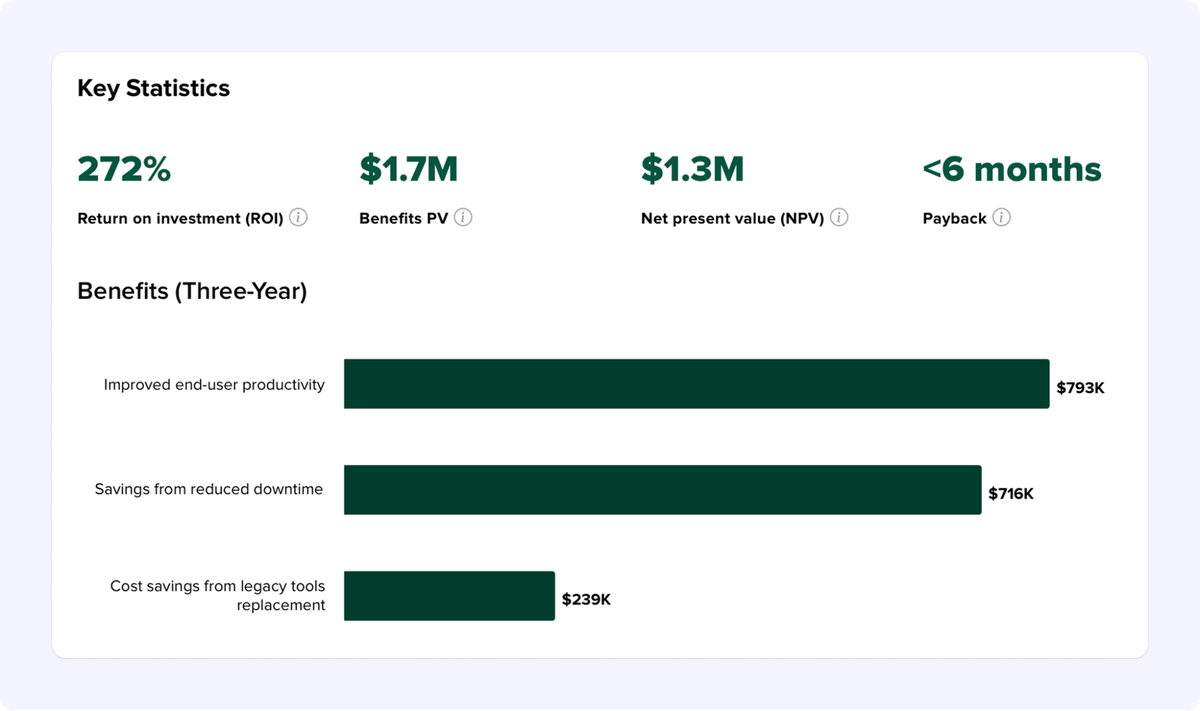
The study found that enterprises experience benefits of $1.7 million over three years versus costs of $469,000, resulting in a net present value of $1.3 million.
HOW TO MIGRATE FROM SITECORE TO SANITY
You've made the decision to move from Sitecore to Sanity—excellent choice! Now comes the exciting part where we turn that decision into a structured, efficient, and future-ready migration.
In this comprehensive guide, we'll walk you through every stage of the process—from planning and content modeling to migration execution and post-launch optimization.
Migrating from a traditional CMS like Sitecore to a modern, headless platform like Sanity doesn't have to be intimidating. With the right strategy, tools, and planning, you can ensure a smooth, secure, and scalable transition that maintains your content integrity, preserves SEO equity, and empowers your team with a more flexible content architecture.
Whether you're a developer, content architect, or digital strategist, this guide provides actionable steps, technical insights, and best practices to help you confidently navigate the migration.
Let's break down the process into manageable phases—starting with the foundation: strategy and planning.
STEP 1: HIGH-LEVEL STRATEGY
Before diving into the technical aspects, let's map out a strategic approach to ensure your migration from Sitecore to Sanity is successful. A well-planned migration strategy will save you time, resources, and potential rework down the line.
Migrating from Sitecore to Sanity isn't simply moving content—it's transitioning from a legacy, monolithic CMS to a modern composable content platform that enables flexibility, scalability, and speed.
1.1 When Should You Migrate?
Timing plays a crucial role in an enterprise CMS migration. The right time to move isn't just when your developers are ready—it's when your business, content operations, and technology roadmap are aligned.
Here are clear signals it's time to consider migrating from Sitecore to Sanity:
- License renewal approaching: If your Sitecore license is up for renewal in the next 3–6 months, it's the perfect time to evaluate Sanity's license-free, usage-based pricing before locking into another expensive cycle.
- Rising maintenance costs: Sitecore requires specialized developers and consultants. Sanity's schema-driven model and open ecosystem significantly reduce long-term maintenance overhead.
- End-of-support for your Sitecore version: If your current Sitecore version is reaching end-of-life, instead of upgrading (which can be costly), consider migrating to Sanity—a platform that evolves continuously via API-first updates.
- Slow publishing workflows: If your editors often wait on developer involvement for simple updates, Sanity's real-time collaboration and structured content editing will streamline that process.
- Scalability limitations: As your digital ecosystem grows, Sitecore's scaling costs rise steeply. Sanity's Content Lake and CDN-backed APIs scale instantly and globally without performance degradation.
- Technical debt accumulation: Over years of Sitecore customization, many organizations build rigid, hard-to-maintain systems. Migrating to Sanity offers a clean, modern foundation built for headless architecture.
Pro tip: Enterprise-grade migrations typically take several weeks to months depending on your content volume, data complexity, and custom features. Begin planning 3–6 months before critical deadlines to ensure enough time for data modeling, testing, and training.
When to Stay vs When to Migrate
Scenario | Stay on Sitecore | Move to Sanity |
|---|---|---|
You rely heavily on legacy Sitecore personalization tools | ✅ | ❌ |
You need faster, API-driven, multi-channel delivery | ❌ | ✅ |
You want to reduce licensing and infrastructure costs | ❌ | ✅ |
You need better editorial experience and real-time collaboration | ❌ | ✅ |
Your team is comfortable with JavaScript/TypeScript | ❌ | ✅ |
You want to avoid vendor lock-in | ❌ | ✅ |
1.2 Why Migrate to Sanity?
If you're reading this guide, you're already considering Sanity—and for good reason. Sanity has rapidly become one of the leading headless CMS solutions used by organizations like Figma, Nike, Cloudflare, and National Geographic.
Here's why Sanity stands out as the ideal alternative to Sitecore:
- Composable and API-first: Sanity lets you structure and deliver content exactly how your frontend applications need it—perfect for omnichannel publishing.
- Cost-effective and scalable: No costly licensing fees or server overheads. You only pay for what you use, and scaling is automatic.
- Schema-driven architecture: Content models live in code—version-controlled, flexible, and developer-friendly.
- Real-time collaboration: Multiple editors can work on the same document simultaneously with real-time updates and version tracking.
- Custom workflows: Build editorial workflows tailored to your team using Sanity Studio's extensibility.
- Developer ecosystem: Sanity integrates seamlessly with modern frameworks (Next.js, Remix, Astro, etc.) and offers SDKs and APIs that simplify frontend connections.
Want to see Sanity in action? Watch this quick 2-minute overview of how Sanity's Content Operating System works:
Here's a high-level comparison between Sitecore and Sanity:
Feature | Sitecore | Sanity |
|---|---|---|
Platform Type | Monolithic CMS | Headless, composable CMS |
Licensing | Enterprise license (expensive) | Pay-as-you-go, usage-based |
Content Delivery | Page-based | Structured content via API |
Customization | Complex, code-heavy | Schema-driven and modular |
Editor Experience | Traditional forms | Real-time, collaborative studio |
Integrations | Built-in modules | API + plugin ecosystem |
Scalability | Limited without infra upgrades | Global CDN-backed content lake |
Sanity's modern architecture aligns perfectly with enterprises seeking content agility, lower total cost of ownership, and long-term maintainability.
1.3 Same Design or New Design?
When migrating from Sitecore to Sanity, you have two main design approaches:
If your existing design is strong and aligns with your brand, you can migrate your content models and replicate the frontend in a modern framework (e.g., Next.js, Remix). But if your brand or UX needs modernization, migration is a great opportunity to refresh.
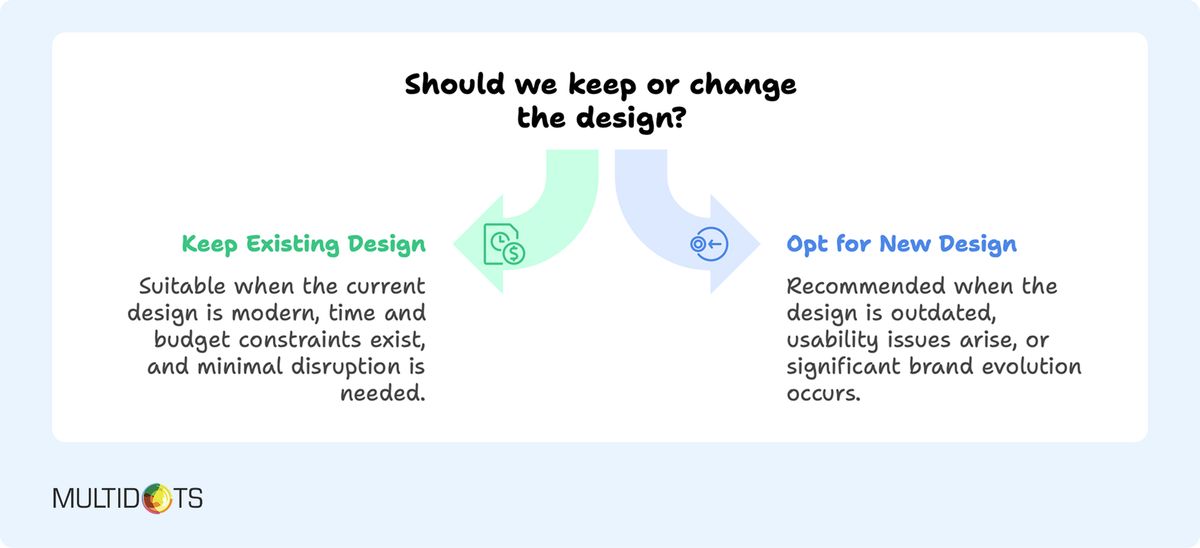
Consider a hybrid approach—maintain your core brand identity while rethinking component structures for Sanity's modular and reusable design model. This maximizes both efficiency and scalability.
1.4 Which Sitecore Features Should You Keep?
Migrating to Sanity doesn't mean losing your favorite Sitecore capabilities. In fact, Sanity provides streamlined, developer-friendly equivalents for most features—often with more flexibility and less complexity.
Sitecore Feature | Sanity Equivalent | Notes |
|---|---|---|
Page Templates | Document Schemas | Define reusable content types via schema files |
Layouts & Components | Structured Content Blocks | Build composable layouts using arrays of sections |
Media Library | Asset Management | Sanity's Asset Pipeline handles optimization & CDN delivery |
Workflows | Custom Actions & Webhooks | Integrate publishing workflows using API + Studio plugins |
Personalization | Frontend or API Layer | Implement dynamic personalization in frontend logic |
Multilingual Support | i18n Plugin + Structured Fields | Manage translations via schemas or language references |
User Roles | Role-Based Access Control (RBAC) | Assign permissions via Sanity project settings |
1.5 Define Your Migration Objectives
Before moving forward, clearly define why you're migrating and what success looks like:
Common migration objectives:
- Reduce costs by eliminating Sitecore licensing fees
- Improve editorial efficiency with modern, collaborative tools
- Enable omnichannel content delivery across web, mobile, and IoT
- Increase development velocity with modern JavaScript frameworks
- Enhance performance through API-driven architecture
- Future-proof your content infrastructure
How will success be measured?
- Content parity between Sitecore and Sanity
- SEO rankings maintained or improved
- Editorial team productivity gains (time to publish)
- Developer velocity improvements (time to implement features)
- Cost savings realized within the first year
- Site performance metrics (Core Web Vitals)
1.6 Choose Your Migration Approach
You have three primary approaches for migrating from Sitecore to Sanity:
Full Migration (Big Bang): Move all content at once. Best for smaller sites needing urgent Sitecore exit. Fastest but higher risk.
Phased Migration (Gradual): Migrate sections incrementally with testing between phases. Best for large, complex sites. Lower risk, longer timeline.
Hybrid Approach (Parallel): Run both systems simultaneously during transition. Best for mission-critical sites requiring zero downtime. Most complex but safest.
Our recommendation: For most enterprises, a phased migration offers the best balance of risk management and efficiency.
1.7 Who Should Handle the Migration?
Deciding whether to handle your Sitecore to Sanity migration in-house or hire experts depends on several factors:
Consider Your Internal Team If:
- You have JavaScript/TypeScript developers available
- Your team has experience with headless CMS platforms
- Your Sitecore implementation is relatively straightforward
- You have 4–6 months for the migration
- You're willing to accept learning curve risks
Hire Migration Experts If:
- Your Sitecore implementation is highly customized
- You need to minimize timeline and risk
- You lack headless CMS experience
- You want knowledge transfer to your team
- You need post-launch support and optimization
The Hybrid Approach:
Many successful migrations employ a hybrid approach where:
- Migration experts handle technical architecture and content transfer
- Your internal team contributes domain knowledge and requirements
- Post-migration, your team takes ownership with initial expert support
This collaboration leverages outside expertise while building internal capabilities, setting you up for long-term Sanity success.
What to look for in a migration partner:
- Proven track record of Sitecore to Sanity migrations
- Experience with modern JavaScript frameworks (Next.js, Remix, etc.)
- Strong case studies from similar industries
- Transparent methodology and migration process
- Commitment to knowledge transfer and training
- Post-launch support offerings
At Multidots, we bring extensive experience with complex CMS migrations and specialize in helping enterprises transition to modern, headless architectures. We've helped organizations migrate from Sitecore, AEM, and other traditional platforms to flexible, scalable solutions.
As certified Sanity experts, we combine deep technical knowledge with proven migration methodologies to ensure your transition is smooth and successful.
You can also book a free 30-minute call with us for any questions on Sanity.
STEP 2: GETTING READY FOR THE MIGRATION
With a high-level migration strategy in place, you're ready to tackle the necessary preparations to ensure a smooth process. This preparation phase is critical—it prevents data loss, maintains SEO equity, and ensures all stakeholders are aligned.
2.1 Backup Your Sitecore Environment
First things first—always, always back up your data. This is your safety net should anything go wrong during migration.
Here's how to create comprehensive backups of your Sitecore environment:
Content backup:
- Log into Sitecore as an administrator
- Navigate to Control Panel → Database
- Use Package Designer to create packages of your content tree
- Export packages for each major content area
- Store packages in multiple secure locations
Media Library backup:
- Navigate to Control Panel → Localization → Export Languages
- Select your Media Library for export
- Download all media assets with metadata
- Store assets organized by folder structure
- Document asset relationships and usage
Configuration backup:
- Export all Sitecore templates and layouts
- Document custom components and their configurations
- Save integration settings and API configurations
- Record user roles and permissions
- Export workflow definitions
Database backup:
- Create full database backups of master, web, and core databases
- Include transaction logs for point-in-time recovery
- Test restore procedures before proceeding
Pro tip: Test your backups by restoring them to a development environment before proceeding with migration. Store backups in multiple locations, including secure cloud storage with encryption enabled.
2.2 Content Inventory and Audit
A thorough content inventory helps you understand exactly what needs to be migrated and how it should be organized in Sanity.
What to inventory:
Content types and volumes:
- Total number of pages, posts, and custom content types
- Media assets (images, videos, PDFs, documents)
- User-generated content (if applicable)
- Archived or draft content
Content relationships:
- How content is interconnected (references, links)
- Taxonomy structures (categories, tags)
- Content hierarchies and navigation structures
- Related content associations
Custom functionality:
- Personalization rules and variations
- Forms and their submission data
- Custom components and their data
- Integration points with external systems
Content quality assessment:
- Identify outdated content for archival
- Find duplicate or redundant content
- Note content requiring updates or rewrites
- Flag content with broken links or missing assets
Use tools like Screaming Frog or Sitebulb to crawl your Sitecore site and generate comprehensive reports.
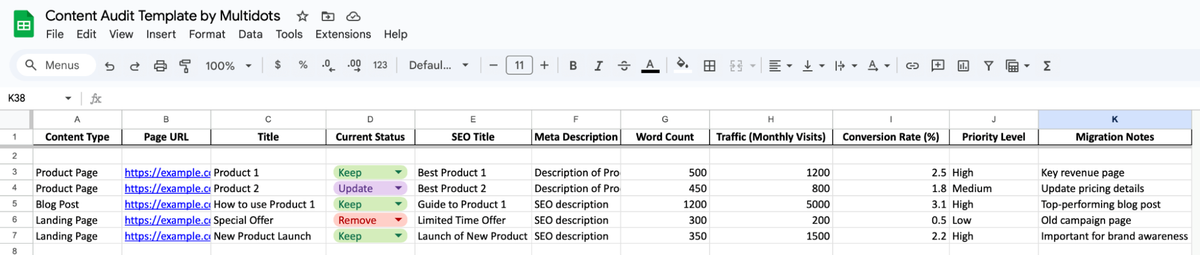
Looking to take control of your content migration?
Use our Content Audit Template to track all your content systematically. This template includes tabs for different content types and fields for organizing, prioritizing, and streamlining every step.
Pro tip: This is an excellent opportunity to clean up your content. Don't migrate content you no longer need—it just adds complexity and cost.
2.3 Snapshot of Page Rankings & Performance
Before migrating, capture your current SEO and performance metrics. This gives you a baseline to compare against after migration and helps you prioritize high-value pages.
Tools to capture your pre-migration data:
- Google Search Console: Export all indexed URLs and their performance data
- Google Analytics: Pull organic traffic data for the past 6-12 months
- SEMrush/Ahrefs: Export keyword rankings for your top pages
- Screaming Frog: Crawl to capture all meta titles, descriptions, and headers
- Google PageSpeed Insights/GTmetrix: Test key landing pages and record LCP, FID, and CLS scores
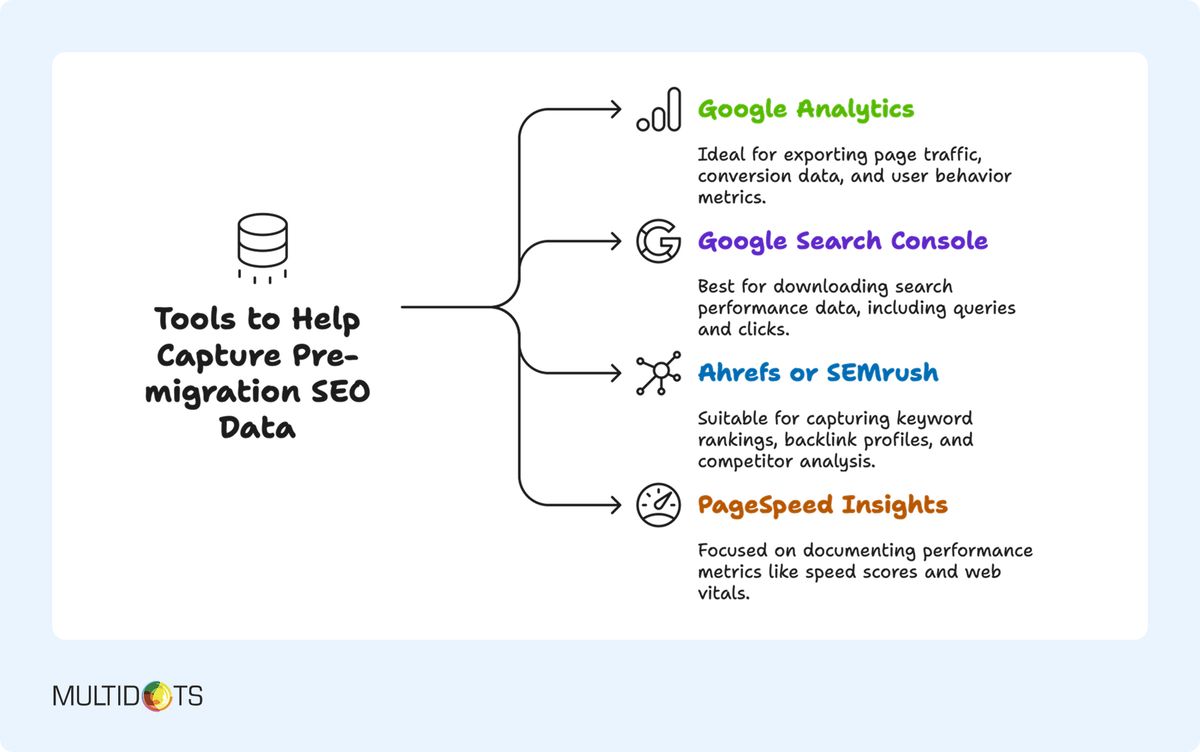
Most importantly, export a complete list of your top-performing pages by organic traffic. These pages will need special attention during migration to preserve their SEO value.
2.4 Analyze Sitecore Content Structure
Understanding how your content is organized in Sitecore is crucial for planning its Sanity structure.
Document your content tree hierarchy and how content is nested. List all Sitecore templates, their field types, and any template inheritance chains. Catalog rendering components and their data sources. Map your taxonomy structures including categories, tags, and custom classifications.
This analysis ensures your Sanity schema maintains logical organization while leveraging Sanity's more intuitive and flexible content modeling approach.
2.5 Document Integrations and Dependencies
Your Sitecore site doesn't exist in isolation—it's part of a broader technology ecosystem. Documenting these connections ensures business continuity.
What tools to document:
- Marketing tools (HubSpot, Marketo, Google Analytics)
- Ecommerce systems (payment gateways, shopping carts)
- CRM platforms (Salesforce, Dynamics)
- Authentication providers (SSO, OAuth)
- Digital asset management (DAM)
For each integration, document:
- How it connects to Sitecore (API, webhook, plugin)
- Data flows (what data moves where)
- Frequency of sync or updates
- Business criticality (must-have vs. nice-to-have)
Most integrations can be migrated or replicated with Sanity, often with simpler, more maintainable implementations.
STEP 3: SET UP SANITY
After mapping out your migration strategy, it's time to establish your Sanity environment. This step is crucial as it lays the foundation for how your content will be structured, who can access it, and how users will interact with it.
A properly configured Sanity setup ensures that you're not just replicating your Sitecore website, but actually enhancing it by leveraging Sanity's flexibility, performance, and user-friendly features.
3.1 Install and Initialize Sanity
Let's get your Sanity project up and running.
Installation steps:
1. Install Sanity CLI:
Loading...2. Create a new Sanity project:
Loading...You'll be prompted to:
- Log in with your Sanity account (or create one)
- Choose a project name
- Select a dataset configuration (production, staging, development)
- Choose a starting template or blank schema
Start Sanity Studio locally:
Loading...Your Sanity Studio will be available at http://localhost:3333
Pro tip: Start with a blank schema rather than a template. This gives you complete control over your content model from the beginning.
3.2 Content Modeling and Schema Design
Content modeling is where Sanity truly shines. Unlike Sitecore's rigid templates, Sanity's schema-driven approach gives you complete flexibility.
Best practices for schema design:
Start with document types:
Think of documents as your primary content types (Pages, Articles, Authors, Products, etc.).
Loading...Map Sitecore templates to Sanity schemas:
Sitecore Concept | Sanity Equivalent |
|---|---|
Template | Document Schema |
Field | Schema Field |
Standard Values | Default Values in Schema |
Rendering Parameters | Component Props/Objects |
Base Templates | Schema Composition |
Insert Options | Referenced Types |
Use structured content (Portable Text):
Sanity's Portable Text is a rich text format that's portable across platforms—unlike Sitecore's HTML-based rich text.
Loading...Implement content references:
Sanity's reference fields create relationships between documents—similar to Sitecore's Droptree or Multilist fields but more flexible.
Loading...Create reusable objects:
For content blocks that appear across multiple document types:
Loading...Implement content references:
Sanity's reference fields create relationships between documents—similar to Sitecore's Droptree or Multilist fields but more flexible.
Loading...Create reusable objects:
For content blocks that appear across multiple document types:
Loading...3.3 Set Up User Roles and Permissions
Sanity provides role-based access control (RBAC) to manage who can do what in your project.
Default roles:
- Administrator: Full access to project settings, datasets, and Studio
- Editor: Can create, edit, and publish content
- Viewer: Read-only access to content
Custom roles:
For more granular control, create custom roles in your Sanity project settings:
Loading...Pro tip: Start with broad permissions and narrow them down based on actual usage patterns. It's easier to restrict later than to troubleshoot permission issues early on.
3.4 Configure Environments and Datasets
Sanity supports multiple datasets for different environments (production, staging, development).
Dataset configuration:
Create datasets for each environment:
Loading...Set up Cross-Origin Resource Sharing (CORS) origins:
Configure which domains can access your Sanity content:
- Go to your project settings at sanity.io/manage
- Navigate to API settings
- Add CORS origins for your frontend applications:
- http://localhost:3000 (development)
- https://staging.yoursite.com (staging)
- https://www.yoursite.com (production)
Configure API tokens:
Generate tokens for different purposes:
- Read tokens for public content delivery
- Write tokens for migration scripts and integrations
- Deploy tokens for CI/CD pipelines
3.5 Integrate with Your Frontend
Sanity is framework-agnostic, but here are the most common setups:
Next.js Integration (Most Popular)
Install dependencies:
Loading...Create Sanity client:
Loading...Fetch content:
Loading...Enable Preview Mode
Sanity's real-time preview lets editors see changes before publishing:
1. Set up preview in Next.js:
Loading...2. Configure in Sanity Studio:
Loading...3.6 Implement Internationalization (if needed)
For multilingual sites, Sanity offers flexible i18n options:
Option 1: Document-level translations
Create separate documents for each language:
Loading...Option 2: Field-level translations
Use Sanity's internationalization plugin:
Loading...Loading...Pro tip: Choose your i18n approach based on how much content varies between languages. If translations are straightforward word-for-word, use field-level. If content structures differ significantly by language, use document-level.
STEP 4: LAUNCH
Now comes the exciting part—actually migrating your content and launching your new Sanity-powered site. This phase requires careful coordination and thorough testing to ensure everything works perfectly.
4.1 Content Migration from Sitecore
Content migration is the heart of your Sitecore to Sanity transition. Let's break this down into manageable steps.
Export Content from Sitecore
Step 1: Log in to Sitecore as an administrator
Step 2: Navigate to Control Panel → Localization → Export Languages
Step 3: Select language and root content item
Choose the top-level Sitecore item that contains all the content you want to export.
Step 4: Complete the export
Wait for the process to complete and download the XML file.
Step 5: Export additional languages
Repeat the process for each language variant if your site is multilingual.
Step 6: Store XML files securely
Save the exported XML files in a secure location for transformation.
Transform Sitecore XML to Sanity Format
Sitecore exports content in XML format, which needs to be transformed into Sanity-compatible JSON. This typically requires custom scripts.
Example transformation script structure:
Loading...Pro tip: Start with a small subset of content (10-20 items) to refine your transformation scripts before migrating everything.
Verify Content Migration
After importing, verify that the content appears correctly:
- Check document counts in Sanity Studio match Sitecore counts
- Validate field mappings - titles, slugs, rich text, dates
- Verify references between documents (authors, categories, etc.)
- Test rich content rendering with Portable Text
- Confirm media assets are linked correctly
- Review localized content if multilingual
Use Sanity's Vision plugin to run GROQ queries and inspect your dataset.
4.2 Migrate Media Assets
Media assets are crucial for user experience and SEO. Here's how to migrate them from Sitecore to Sanity.
Export Media from Sitecore
Step 1: Navigate to Media Library in Sitecore
Step 2: Use Package Designer to export media items
Create packages for different media folders if your library is large.
Step 3: Download media packages
Store them in an organized folder structure.
Optimize Assets for Sanity
Before importing, optimize your assets:
Images:
- Compress without quality loss (use tools like ImageOptim or TinyPNG)
- Convert to modern formats (WebP) where appropriate
- Ensure proper naming conventions
- Add descriptive alt text
Videos:
- Compress for web delivery
- Consider hosting on specialized platforms (YouTube, Vimeo) and referencing in Sanity
- For self-hosted, ensure proper codec and bitrate
Documents:
- Compress PDFs
- Ensure accessibility (searchable text, proper structure)
- Consider converting very large files to optimized versions
Pro tip: Sanity automatically handles image optimization and CDN delivery. Your images will be served through Sanity's CDN with on-the-fly transformations.
4.3 URL Mapping and SEO Preservation
Maintaining SEO equity during migration is crucial. Proper URL mapping ensures you don't lose search rankings.
Create Comprehensive URL Map
Export all Sitecore URLs:
Use a crawler like Screaming Frog to export all current URLs:
- Public pages
- Blog posts and articles
- Media assets
- PDF documents
- Any other indexed content
Map to new Sanity-powered URLs:
Create a spreadsheet mapping old Sitecore URLs to new URLs:
Old Sitecore URL | New URL | Redirect Type |
|---|---|---|
/news/article-one | /articles/article-one | 301 |
/about-us.aspx | /about | 301 |
/media/file.pdf | /assets/file.pdf | 301 |
4.4 Testing Your New Website
Thorough testing is critical before taking your new Sanity-powered website live. Here's what you should test and how to do it effectively.
Category | Checklist Item | Details |
|---|---|---|
Design And Functionality Testing | Cross-browser testing | Verify your site looks and functions correctly across Chrome, Firefox, Safari, Edge |
Mobile responsiveness | Test on various devices and screen sizes to ensure proper adaptation | |
Navigation and user flow | Check that all menus, links, and user journeys work as expected | |
Forms and interactive elements | Test all forms, buttons, and components for proper functionality | |
Third-party integrations | Verify that all integrated services (CRMs, analytics, marketing tools) are working. | |
SEO Preservation Testing | URL structure | Ensure permalink structure is clean and SEO-friendly |
Redirects | Test all 301 redirects from old Sitecore URLs to new WordPress URLs | |
Meta data | Verify migration of titles, descriptions, and meta info | |
Sitemap and robots.txt | Create and validate new XML sitemap and robots.txt files | |
Schema markup | Ensure structured data is implemented correctly | |
Performance Testing | Page speed | Use tools like PageSpeed Insights, GTmetrix. or Lighthouse |
Load testing | Simulate high-traffic scenarios to test peak load handling | |
Server response time | Ensure server responds quickly to requests |
Start by validating all content in Sanity Studio, check that documents, field mappings, references, and media assets migrated correctly.
Test your frontend functionality including dynamic routes, real-time preview, and interactive components across multiple browsers and devices using tools like BrowserStack. Run performance audits with Google Lighthouse and GTmetrix to ensure you meet Core Web Vitals benchmarks.
Validate all SEO metadata, 301 redirects, and sitemaps to preserve search rankings. Finally, test third-party integrations, webhooks, and any automated workflows to ensure everything functions seamlessly before launch.
STEP 5: TRAIN YOUR TEAM
Congratulations! Your Sitecore content has successfully migrated to Sanity, and your new headless CMS is up and running. But the migration doesn't end here.
Your team, accustomed to Sitecore, now faces a completely new digital workspace—Sanity Studio—which operates differently from traditional CMS platforms.
Proper training ensures your team feels confident, productive, and empowered to leverage the full capabilities of Sanity.
5.1 Learn Sanity Basics
Sanity is designed for flexible, structured content management, but there's still a learning curve. Tailoring training to your team's roles ensures efficiency and smooth adoption.
Suggested Learning Paths:
Beginner Users (Editors & Content Creators):
- Navigating Sanity Studio dashboard
- Creating, editing, and publishing content
- Understanding document types, fields, and Portable Text blocks
- Working with images and media library
- Using preview mode to see changes before publishing
Intermediate Users (Marketers & Power Editors):
- Using references and nested components
- Managing media assets and optimizing images
- Working with drafts, versions, and publishing workflows
- Scheduling content for future publication
- Understanding content relationships
Advanced Users (Administrators & Developers):
- Configuring and customizing schemas
- Managing datasets, roles, and permissions
- Leveraging webhooks and API queries
- Integrating with frontend applications
- Troubleshooting common issues
See how content teams actually work in Sanity Studio with this comprehensive demo :
This demo shows real-world workflows that your team will use daily after migrating from Sitecore.
5.2 Create Internal Training Materials
Task-specific guides help your team transition from Sitecore to Sanity effectively. Focus on creating practical resources tailored to your workflow.
Video Tutorials
Short, focused video tutorials are invaluable for learning complex actions in Sanity Studio:
- Adding and publishing a new document or page
- Updating existing content without breaking structured fields
- Uploading and optimizing images using Sanity's asset pipeline
- Managing references between documents (authors, categories, tags)
- Using Portable Text for rich content creation
- Triggering frontend rebuilds via webhooks or preview updates
Pro tip: Screen recordings with clear narration are effective—professional production is not required. Host these videos in a central location (Google Drive, Notion, or your intranet) accessible to the entire team.
Quick Reference Guides
Provide one-page cheat sheets or PDF guides for recurring workflows:
- Editorial workflow checklists (draft → review → publish)
- Best practices for using Portable Text and rich content blocks
- Media asset standards (file types, resolution, alt text)
- Decision trees for content classification and tagging
- Common troubleshooting tips
These quick references help editors and marketers work confidently without constantly searching for help.
Internal Documentation
Create a central knowledge base for your team:
- Schema field descriptions and when to use each
- Content guidelines and brand standards
- SEO best practices for your organization
- Workflow diagrams showing approval processes
- Contact information for support and escalation
5.3 Professional Training from Sanity Experts
While self-guided learning is helpful, professional training ensures your team fully grasps the differences between Sitecore and Sanity, minimizing frustration and accelerating adoption.
At Multidots, we are certified Sanity experts with extensive experience implementing and migrating to Sanity CMS. When you choose Multidots for your Sitecore to Sanity migration, comprehensive team training is included as part of our migration services.
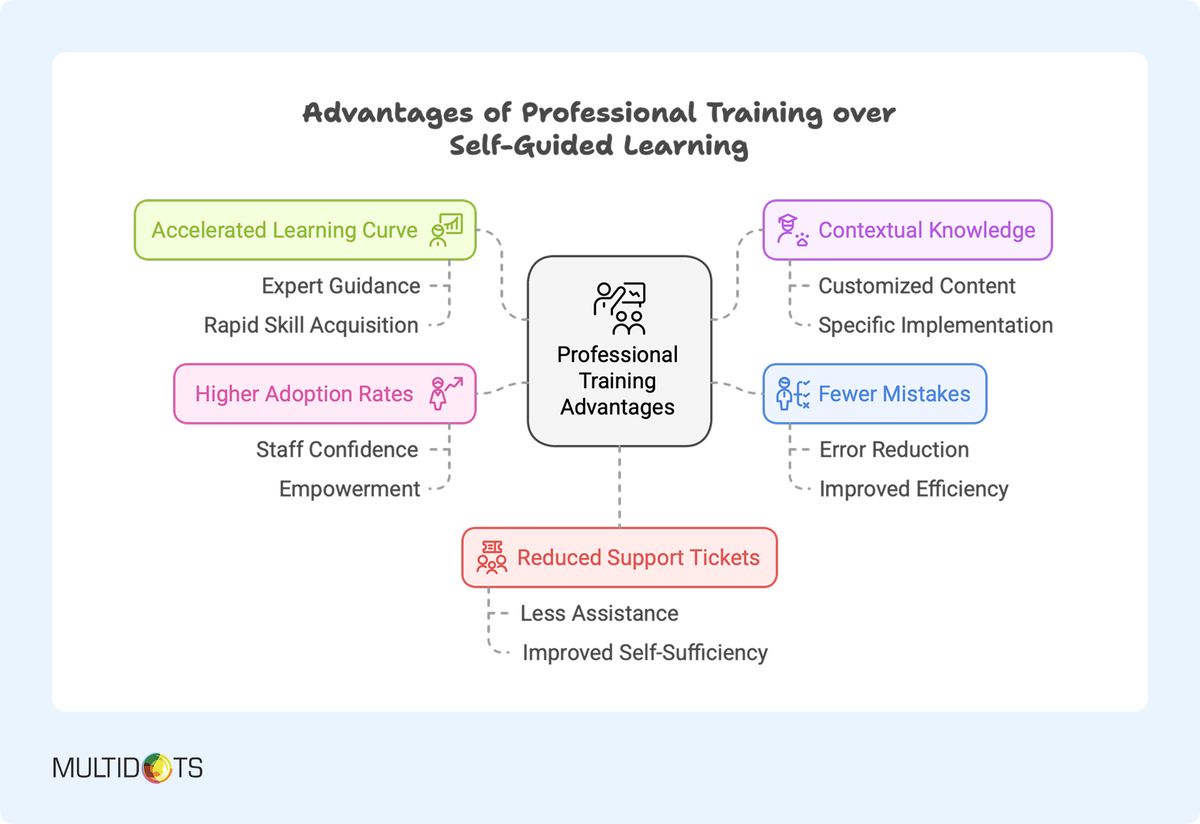
Our Training Includes:
Custom workshops tailored to your specific Sanity project and content architecture
Role-based sessions designed for editors, administrators, marketers, and developers
Hands-on exercises using your actual dataset and frontend setup—not generic examples
Advanced feature sessions:
- Mastering Portable Text for flexible, structured content
- Content modeling best practices for your use cases
- Working with references and relationships effectively
- Leveraging webhooks, integrations, and API queries
Live Q&A sessions addressing your team's specific questions and scenarios
Follow-up support during the critical first 30–60 days post-launch to ensure smooth adoption
Benefits of Professional Training:
Advantage | Why It Matters |
|---|---|
Faster onboarding | Teams learn platform workflows efficiently |
Reduced errors | Proper content entry avoids broken references or layout issues |
Maximized value | Leverage Sanity's headless CMS capabilities fully |
Role-specific guidance | Tailored training for editors, developers, or marketers |
Ongoing support | Continuous support ensures smooth adoption |
FREQUENTLY ASKED QUESTIONS
- Link Copied
Migration timelines vary based on content volume, complexity, and customization needs. Most enterprise migrations take 12–20 weeks, including planning, development, content migration, testing, and training. Phased migrations may extend this timeline but reduce risk.
- Link Copied
No, with proper planning and execution, your SEO rankings should be preserved or even improved. The key is implementing comprehensive URL mapping with 301 redirects, migrating all metadata correctly, and optimizing your new site's performance. Most clients see maintained or improved rankings within 2–3 months post-migration.
- Link Copied
Migration costs vary widely based on:
- Content volume and complexity
- Custom functionality requirements
- Frontend development needs (new vs. existing)
- Whether you use internal resources or hire experts
Expect migration costs to be significantly offset by Sitecore licensing savings within the first year. Contact us for a customized estimate based on your specific needs.
- Link Copied
Absolutely! Phased migration is often the recommended approach for large, complex sites. You can migrate section by section, validate each phase, and minimize risk. This allows your team to learn Sanity gradually while maintaining business continuity.
- Link Copied
Most Sitecore components can be recreated in Sanity using structured content blocks and custom input components. Sanity's flexible schema system often makes it easier to build and maintain custom components compared to Sitecore's rigid architecture.
- Link Copied
That depends on your current setup. If your Sitecore site uses traditional MVC views, you'll need a new frontend (typically Next.js, Remix, or similar). However, this is often an opportunity to modernize your architecture and improve performance. If you already have a headless setup, integration with Sanity is straightforward.
- Link Copied
Sanity offers flexible multilingual support through field-level or document-level translations. You can choose the approach that best fits your content strategy. The internationalization plugin simplifies managing translations and language variations.
- Link Copied
Sanity provides flexible workflow capabilities through draft/publish states, scheduled publishing, and custom document actions. Many clients build sophisticated approval workflows using Sanity's extensibility—often simpler and more tailored than Sitecore's workflow engine.
- Link Copied
Yes! Sanity is built on a globally distributed Content Lake backed by a powerful CDN. It scales automatically to handle traffic spikes without performance degradation. Sites with millions of monthly visitors use Sanity successfully.
- Link Copied
Most migration partners (including Multidots) offer post-launch support packages. Additionally, Sanity provides enterprise support plans, extensive documentation, and an active community. Your team will also have access to regular Sanity platform updates and improvements.

![]() BlogSitecore to Sanity Migration Guide for Enterprises
BlogSitecore to Sanity Migration Guide for Enterprises
Book a Free Sanity Demo
Let’s chat about your content goals—and show you what’s possible with Sanity.